You must be signed in to read the rest of this article.
Registration on CDEWorld is free. Sign up today!
Forgot your password? Click Here!
Dental composites are plastics filled with glass particles. In the early 19th century, the production of vulcanized rubber, gutta percha, shellac, polystyrene, and rayon introduced plastics to the world.1 Plastics were commonly used in dental prostheses in the early 1900s, with mixed results. The invention of acrylics in 1931 increased the use of plastics; however, conversion of acrylic monomer to polymer resulted in 24.8% shrinkage.2 Shrinkage in plastics such as acrylics occurs as single molecules (monomers) move from van der Waal’s distances of 4 angstroms to long-chain molecules (polymers) and intermolecular distances of 1.9 angstroms. Use of larger molecules and fillers such as prepolymerized particles reduced shrinkage and made these materials workable.
Silicate cement was one of the early dental materials used for fillings.3 Acrylics were rarely employed because they led to pulpitis and periodontitis.4,5 In the 1950s, Michael Buonocore established bonding principles with phosphoric acid and acrylic materials. Acrylic material was bonded for use as sealants and adhering orthodontic brackets to teeth.6 Rafael L. Bowen combined acrylic resins with epoxy to produce an esthetic composite with good physical properties. BIS-GMA resin—a mixture of bisphenol A and glycidyl methacrylate diluted with glycol dimethacrylate—was combined with glass beads. The resulting composite proved to be hydrolytically unstable, so further work was necessary. Eventually, combinations of resins and fillers, including several that crosslinked polymer chains such as triethylene glycol dimethacrylate and ethylene glycol dimethacrylate, produced a successful dental composite.7,8
When compared with earlier composites, modern composites shrink less and wear less. In addition, they have more resistance to water and chemical breakdown, better mechanical strength, highly polishability, and better color stability and matching, and are available in various consistencies from flowable to packable.9,10 Composite resins have been combined with other materials to improve caries resistance, as seen with resin ionomers.3 Advancements in bonding technologies, especially the eight generations of dentin bonding, have improved the longevity of restorations and reduced postoperative sensitivity. Resin bonding agents produce an oxygen-inhibited outer layer that remains uncured, therefore the addition of composite materials joins to it.11 Case 1 shows results of modern bonded composites restoring a Class V cavity with no mechanical retention (Figure 1 through Figure 3).
Curing of dental composite is accomplished by the production of free radicals either from chemical reaction or heat- or light-sensitive components. Early composites mixed a catalyst and base to create free radicals and harden composite. Heat activation produced free radicals and cured denture materials. Light-cured composites revolutionized their use, allowing dentists to control curing time. The material could be placed in the exact location and shape desired without worrying about time constraints, although ambient light slowly hardens materials, limiting working time somewhat. Dentists can layer composite in order to minimize negative effects of shrinkage, while continually shaping to achieve the desired final result. This exact placement minimizes post-cure shaping and polishing.
Composites provide excellent replications of teeth, and experience and knowledge of various materials allows ease of use. Color, including hue, value, chroma, translucency, and florescence, is close to natural tooth structure. Custom coloring and adding details such as hypocalcifications or craze lines is accomplished by mixing or applying color tints. Opaque materials block tooth discoloration or the darkness in the back of the mouth showing through a filling.12 This darkness may show through a filling extending from the lingual to the facial surfaces, if highly translucent.13
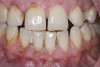
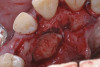
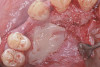
Case 2 demonstrates composite restoration following orthodontics. Surface concavities on the facial of the lateral and central incisors, papillae loss between the central incisors, severe incisal wear on left central incisor, and a poorly shaped right lateral incisor were restored with composite. Placement of a clear matrix that reflected the gingiva allowing subgingival bonding and composite placement closed the gingival embrasure between the central incisors (Figure 4 and Figure 5).
Modern Composites
Composite restoration is one of the most demanding dental procedures. It requires 12 areas of expertise: smile design; color; tooth color, shape, and position; esthetic goals; tooth preparation; bonding techniques; material selection; and composite placement, shaping, and finishing.14 Commonly performed procedures address caries, craze lines, discolorations, decalcifications, surface defects, exposed dentin, peg laterals, diastemas, chips and fractures, cracks, abrasion, attrition, gingival defects, surface wear, deep pits and fissures, periodontal splinting, developmental defects, and fractured porcelain.
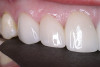
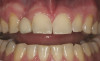
In Case 3, diastemas between front teeth were closed with composite. The maxillary lateral incisors were increased in size to be proportionately correct to the central incisors. Completion required all 12 principles of composite restoration (Figure 6 through Figure 9).
Basic Science
Understanding the science of composites is important for proper technique. Resin mixtures, such as methyl methacrylate (MMA), bisphenol A dimethacrylate (BIS-DMA), triethylene glycol dimethacrylate (TEGDMA), ethylene glycol dimethacrylate (EGDMA), and urethane-dimethacrylate (UDMA), are used to improve material properties by crosslinking polymer chains (Table 1).15 Composite resins are filled with glass particles to reduce shrinkage by creating less resin. Fillers provide better working properties and functioning characteristics. Dental composites consist of materials that match tooth color and translucency, so an optical index of 1.5 for filler material is required.16,17 Materials such as strontium glass, barium glass, quartz, borosilicate glass, ceramic, silica, and prepolymerized resin are used.
Fillers impact composite behavior. Filler material surface, size, shape, surface modifiers, optical index, filler load, and size distribution affects composite.18 Filler must be wet by resin, which limits the amount of filler that can be incorporated into resin. The filler-to-resin interface is a high-stress area when resin cures and for this reason, surfaces of fillers are treated with coupling agents that increase interface strength to overcome interface breakdown.
The resin–filler interface is important for most physical properties. Three causes of stress on this interface include resin shrinkage pulling on fillers, difference in filler and resin modulus of elasticity, and difference in filler and resin thermal coefficient of expansion.19 Coupling agents, including vinyltriethoxysilane and methacryloxypropyltrimethoxysilane, are used to improve adherence of resin to filler surfaces.20 Modification of the filler’s physical surface structure, such as roughening and aggregating filler particles, creates mechanical locking to further improve interface strength. Cracks in composites strike and work around particles, so interface characteristics are important for strength. Larger particles inhibit cracks as there is more surface area.
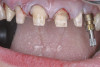
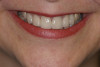
A critical filler size is 1 µm. Fillers greater than 1 µm are visible to the eye.21 As resin matrix around filler particles wears, fillers become prominent and visible, resulting in a composite surface that appears rough. As a result, a filling can seem smooth after placement and polishing, only to appear rough a year later. However, fillers less than 1 µm do not produce this rough surface effect with age. Case 4 shows restoration of peg laterals following orthodontic treatment in an 18-year-old female, using a micro hybrid composite (Figure 10 and Figure 11).
Exposure of particles is critical to wear. As resin matrix wears, particles’ surfaces are exposed to mechanical force, and they pluck out. Plucking resulted in major failure of the original posterior composites constructed with 10 µm fillers almost 30 years ago. With large particles of 10 µm, there is plucking and excessive wear on composite surfaces from excessive force on the filler. Composite wear can be caused by adhesive, abrasive, and chemical wear, as well as fatigue.22
Fillers greater than 1 µm are referred to as macrofills; fillers less than 1 µm are microfills. A new classification of filler is based on nanoparticles of 5 Nm to 450 Nm. Nanoparticles fill in between larger particles to further reduce shrinkage or are used as the primary filler. Nanoparticles have been available for some time, but early particles aggregated when being produced, which limited their use for dental composites. Later research produced particle separation, and individual particles could be added to composites. Most common composites have a bell curve of particle size peaking at 0.7 µm, which is then filled interstitially with nanoparticles.23 A mixture of different particle sizes is referred to as a hybrid.
Resin cure is inhibited by oxygen. Outer layers of composite, which are touched by air, do not harden. This oxygen inhibition is useful during the restorative process, allowing layering techniques to minimize the negative effects of shrinkage. By creating stress on tooth structure and composite-to-tooth interfaces, shrinkage can result in cusp fracture, enamel fracture, or microleakage.24 An enamel fracture fills with debris from polishing to create a white line at the margin of a filling.
Oxygen inhibition weakens composite when components are mixed because air is entrapped: this prevents curing where the air touches composite within the mix. Procedures that trap air include mixed self-cure composite, mixed resin cement, and mixed tints with composite. Composite cures more thoroughly in a vacuum that eliminates oxygen. Laboratory-processed composites combine vacuum with heat and pressure to produce even stronger composite.
Shrinkage creates various amounts of stress during composite curing. The amount of stress created depends on the number of walls in a tooth preparation. A surface one-wall preparation results in composite pulling down to the surface with little stress, whereas a posterior Class I five-wall preparation creates extreme stress as opposing and adjacent walls interact. A Class I preparation bulk filled with a traditional composite and cured results in a gap at the floor of the preparation and extreme pain for the patient, which may last for a long time. The amount of stress created by composite shrinking in different restorative preparations is referred to as the C factor, which is the number of walls that the filling material is touching over the number of walls it is not touching when cured.25,26
Case 5 is a series of Class I restorations with five walls on the first and second molars. Extension for prevention associated with amalgam preparations is not required as the grooves are sealed. Restoration includes access to and removal of carious lesion, enamel finishing, bonding, layering, and finishing composite materials. Layering in small areas is difficult; when areas are very small, such as grooves, a flowable composite or sealant is used (Figure 12 and Figure 13).
Layering techniques that maintain an oxygen-inhibited layer on composite surfaces result in a uniform structure. Sectioning of a layered filling would appear as if the composite had been placed in bulk because the layers would not be evident.
Layering techniques during composite placement minimize the negative effects of shrinkage by creating small incremental shrinkage. Placement of composite layers should touch as few walls as possible to further reduce stress. The final outer layer of a restoration is oxygen-inhibited and must be covered to eliminate contact with air and complete composite polymerization. Coating composite with glycerin and light curing is a popular technique. Alternatively, composite is overbuilt and the outer uncured layer is removed.27
Resin polymerization includes initiation, propagation, and termination. Initiation, which requires production of free radicals, starts the propagation or continued joining of molecules until termination is reached. Only 80% of resin is cured at termination. Early composites initiated curing with heat or chemical reaction. Early photochemical systems used benzoin methyl ether, which is sensitive to ultraviolet (UV) wavelengths at 365 Nm, to initiate light curing with UV light. However, UV systems had limited use as depth of cure was limited to 1 mm in 60 seconds. Visible light activation of diketones or camphorquinone is the preferred photochemical system. Diketones are activated by visible blue light but produce slow reactions, so amines are added to accelerate curing time.28
Depth of cure depends on light intensity, the inverse of the distance squared combined with composite color and opaqueness. Light-curing systems used natural light to cure composite to depths of 3 mm to 5 mm in 40 seconds. Laser and plasma arc lights cured composite to depths of 3 mm to 5 mm in 3 seconds. Laser and plasma arc lights generated heat on gingival tissues, which led to the use of light-emitting diodes, which cures 3 mm to 5 mm in 5 seconds.
An intermediate gel phase occurs prior to composite hardening. Moving the gel phase to later in the reaction by timing light application and gradually increasing light intensity reduced shrinkage.29,30 This was referred to as ramping or intermittent light application. A “poor man’s ramping” was to hold the light away from the composite and slowly move it closer rather than buying a special light.
Composite Classification
Dental composite is classified by filler type and size, initiation, and viscosity. As discussed earlier in this article, filler classification includes microfill, macrofill, nanoparticle, and hybrid. Initiation classification includes heat, chemical, and light. “Light-cured” composite indicates that photochemical initiation causes polymerization.
Heat-cured composites are polymerized by application of heat. Laboratory heat-processed fillings are processed under nitrogen or vacuum, heat, and pressure to produce a more thorough cure, although techniques vary. Oxygen is eliminated, and the composite reaction is more complete with this technique. A 100% cured composite is too hard and brittle, therefore the cure is slightly above 90%.
Self-cured composite uses chemical initiation to convert monomer to polymer. Self-cured composite mixes a catalyst and base. Core buildup and crown cements are commonly self-cure. Dual-cure composite uses chemical initiation combined with photochemical initiation; either one or both techniques polymerize the composite. Dual-cure composite is commonly used as a cementing medium under crowns and cementing posts where light might not penetrate. Light-cure areas are accessible to light; areas that the light cannot initiate are cured chemically.31
Viscosity determines flow and slump characteristics during placement. A flowable composite applies like liquid or a loose gel, while a packable composite is firm and hard to displace. Flowable composite has a high resin content and little filler, so much shrinkage occurs. Physical properties are diminished, as well. These composites are commonly used to fill small spaces, such as fissures or small cavities and lines under fillings.
A packable composite is filled with glass spheres in special resins to produce a firm consistency and minimize shrinkage. Packable composite was produced to provide a similar feel to amalgam and increase dentist acceptance. Manufacturers expected a firm consistency would improve interproximal contours and contacts. It is questionable if layers join together adequately, as little oxygen-inhibited resin is available to allow the next layer to join. However, studies show packable composite restorations demonstrate longevity similar to conventional composites.32
Wetting tooth surfaces with packable composite is difficult, so lining preparation walls with flowable composite or glass ionomer is common. Improvement in matrix systems and techniques has reduced the demand for packable composites.
Benefits
Dental composites combined with bonding maintain maximum amounts to tooth structure for strength and minimal pulp inflammation during restoration. They are cost effective, with superior esthetic results. When performed properly within recommended situations, minimally invasive dentistry of this nature has historically proven its effectiveness. Bonding technology provides adequate retention and resistance, so minimal preparation is required. To restore carious lesions, access is completed, caries removed, and composite bonded into position.
Restoration Applications and Techniques
Composite is used for Class I to V restorations to address caries, cracks, chips, craze lines, exposed dentin, discolorations, surface defects, peg laterals, diastema closure, veneering, periodontal papillae loss, periodontal splinting, and fractured porcelain. Composite is weaker than amalgam, gold, or porcelain, therefore its use is limited by size and forces applied. High-force areas result in composite fracture, however placement of small restorations on posterior teeth is acceptable. Larger restorations may be placed if forces can be measured and controlled. Large restorations on anterior teeth are used if they can resist functional and parafunctional forces.
Case 6 demonstrates the restoration of a Class II cavity, using layering techniques to minimize the negative effects of shrinkage and maximize esthetics. Because there is no occlusion from an opposing tooth and little force is applied as the patient is a 93-year-old frail female, adequate restorative strength is predicted (Figure 14 through Figure 16).
All composite restorations require tooth preparation, which may include cleaning surfaces to expose them for bonding procedures, roughening surfaces to increase surface area, removing caries, finishing enamel margins to eliminate unsupported enamel or weak areas of composite, creating a cross section of enamel rods to improve bond strength, bonding tooth structure, selecting and placing composite, and finishing of the composite. The traditional retention and resistance form of G.V. Black is not required; however, it is inadvertently created by gaining access for caries removal. Through drilling to gain access to caries, walls are created, but they are not refined and shaped as with amalgam, gold, or porcelain preparation. Bonding to dentin and enamel provides adequate resistance and retention without mechanical retention.33,34 Mechanical retention aids bonding both unintentionally and intentionally.
Color is critical in the esthetic zone. Controlling color in the anterior is divided into two categories: when viewed from the facial, a restoration has tooth backing or no tooth backing.13 Those with tooth backing have a color that may show through a translucent composite. This is most common in Class V restorations as dark dentin may show through composite, depending on the material’s translucency and thickness. Selection of a lightly colored composite or use of an opaque sub layer may be required. Darkness from the back of the mouth may show through restorations with no tooth backing, causing them to look darker or grayish. Class III and IV restorations, peg laterals, and diastema closures most commonly show this effect. This darkness is not seen in the dental chair as light is projected into the mouth. It is normal for tooth structure on the incisal edge and extending into the interproximal areas to look gray or have a halo effect on the incisal edge. This is the result of enamel’s not having dentin behind it, which allows the darkness to show. Use of an incisal shade composite can replicate these areas. The halo effect on an incisal edge may require custom staining and layering techniques.
Case 7 involves a 24-year-old female who presented with a request to improve her smile before her wedding. Observations from the examination revealed bruxism wear on teeth Nos. 6, 8, and 11, a hypocalcification on tooth No. 8, and a development groove on the incisal edge of tooth No. 10. Composite restored the lost incisal tooth structure. The hypocalcified area on the facial of tooth No. 8 was reduced and covered while establishing improved facial contours in the incisal third. A nightguard was used to prevent further damage (Figure 17 and Figure 18).
Conclusion
The science of dental composites is complex. Restorative procedures are based on this science, which needs to be understood to produce long-lasting, highly esthetic restorations. Combining science with the artistic creation of a restoration is what defines excellent dentistry. Proper composite selection, placement techniques, and finishing can be done only if a comprehensive approach is taken.
Disclosure
The author has received an honorarium from Heraeus Kulzer.
References
1. The History of Plastics. Timeline of Plastics. http://inventors.about.com/od/pstartinventions/a/plastics.htm. Accessed July 18, 2010.
2. Cowpwethwaite GF, Foy JJ, Malloy MA. The nature or the cross-linking matrix found in dental composite filling materials and sealants. In: Gebelein CG, Koblitz FF, eds. Biomedical and dental applications of polymers. New York, NY: Plenum Press;1981:379-385.
3. Christensen GJ. The need for caries-preventive restorative materials. J Am Dent Assoc. 2000;131(9):1347-1349.
4. Altintas SH, Yondem I, Tak O, et al. Temperature rise during polymerization of three different materials. Clin Oral Investig. 2008;12(3):283-286.
5. Stanley HR, Swerdlow H, Buonocore MG. Pulp reactions to anterior restorative materials. J Am Dent Assoc. 1967;75(1):132-141.
6. Buonocore MG. A simple method of increasing the adhesion of acrylic filling materials to enamel surfaces. J Dent Res. 1955;34(6):849-853.
7. Bowen RL. Use of epoxy resins in restorative materials. J Dent Res. 1956;35(3):360-369.
8. Bowen RL. Dental filling material comprising vinyl silane treated fused silica and a binder consisting of the reaction product of bis phenol and glycidyl aery late. US patent 3,066,112. November 27, 1962.
9. Albers HF, Dunn JR, Perdigão J. Composite materials in restorative dentistry. Interview by Mark J. Friedman. Compend Contin Educ Dent. 2001;22(8):666-672.
10. Albers HF. New materials: risk or opportunity? J Esthet Restor Dent. 2003;15(1):57-59.
11. Ghivari S, Chandak M, Manvar N. Role of oxygen inhibited layer on shear bond strength of composites. J Conserv Dent. 2010;13(1):39-41.
12. Chalifoux PR. Composite tints: mixing composite materials to alter color and techniques to simulate hypocalcification and craze lines. Compend Contin Educ Dent. 2004;25(8):583-588.
13. Chalifoux PR. Perception aesthetics and light-cured composites. Pract Periodontics Aesthet Dent. 1992;4(5):51-56.
14. Chalifoux PR. Comprehensive composite restoration. Inside Dentistry. 2006;2(4):56-58.
15. O’Brien WJ, Ryge G. An Outline of Dental Materials and Their Selection. Philadelphia, PA: Saunders Co.; 1978.
16. Lee YK, Lim BS, Rhee SH, et al. Changes of optical properties of dental nano-filled resin composites after curing and thermocycling. J Biomed Mater Res B Appl Biomater. 2004;71(1):16-21.
17. Bowen RL. Compatibility of various materials with oral tissues. I. The components in composite restorations. J Dent Res. 1979;58(5):1493-1503.
18. Cross M, Douglas WH, Fields RP. The relationship between filler loading and particle size distribution in composite resin technology. J Dent Res. 1983;62(7):850-852.
19. Bowen RL. Synthesis of a silica-resin filling material: progress report. J Dent Res. 1958;37:90.
20. Bowen RL. Dental filling material comprising vinyl silane treated fused silica and binder consisting of reaction product bisphenol and glycidyl acrylate. US Patent 3,066,112. November 27, 1962.
21. Roulet JF, Roulet-Mehrens TK. The surface roughness of restorative materials and dental tissues after polishing with prophylaxis and polishing pastes. J Periodontol. 1982;53(4):257-266.
22. Lutz F, Phillips RW, Roulet JF, et al. Potential posterior composite composites. An in vitro and in vivo comparison for wear. J Dent Res. 1984;63(6):914-920.
23. Endo T, Finger WJ, Kanehira M, et al. Surface texture and roughness of polished nanofill and nanohybrid resin composites. Dent Mater J. 2010;29(2):213-223.
24. Shawkat ES, Shortall AC, Addison O, et al. Oxygen inhibition and incremental layer bond strengths of resin composites. Dent Mater. 2009;25(11):1338-1346.
25. Van Dijken JW. Durability of resin composite restorations in high C-factor cavities: a 12-year follow-up. J Dent. 2010;38(6):469-474.
26. Nikolaenko SA, Lohbauer U, Roggendorf M, et al. Influence of c-factor and layering technique on microtensile bond strength to dentin. Dent Mater. 2004;20(6):579-585.
27. Lee MR, Cho BH, Son HH, et al. Influence of cavity dimension and restoration methods on the cusp deflection of premolars in composite restoration. Dent Mater. 2007;23(3):288-295.
28. Truffier-Boutry D, Demoustier-Champagne S, Devaux J, et al. A physico-chemical explanation of the post-polymerization shrinkage in dental resins. Dent Mater. 2006;22(5):405-412.
29. Pires-de-Souza Fde C, Drubi Filho B, Casemiro LA, et al. Polymerization shrinkage stress of composites photoactivated by different light sources. Braz Dent J. 2009;20(4):319-324.
30. Lopes LG, Franco EB, Pereira JC, et al. Effect of light-curing units and activation mode on polymerization shrinkage and shrinkage stress of composite resins. J Appl Oral Sci. 2008;16(1):35-42.
31. Willems G, Lambrechts P, Braem M, et al. A classification of dental composites according to their morphological and mechanical characteristics. Dent Mater. 1992;8(5):310-319.
32. Shi L, Wang X, Zhao Q, et al. Evaluation of packable and conventional hybrid resin composites in Class I restorations: three-year results of a randomized, double-blind and controlled clinical trial. Oper Dent. 2010;35(1):11-19.
33. Chalifoux PR. Establishing proper anatomy in Class II posterior restorations. Pract Periodontics Aesthet Dent. 1991;3(1):27-31.
34. Chalifoux PR. Aesthetic guidelines for posterior composite restorations. Pract Periodontics Aesthet Dent. 1996;8(1):39-48.
About the Author
Paul R. Chalifoux, DDS, Private Practice, Wellesley, Massachusetts